Let's find out how to install realistic shaders in Minecraft and transform your game! In this journey, I will show you what they are shaders, how they can make your world look more amazing, and I'll also share some easy tips for installing them. If you're curious about the best shaders, how to improve your world's performance and solve common problems, you're in the right place! Come with me on this adventure to make your Minecraft more beautiful!

What Are Realistic Shaders in Minecraft
Understanding Shaders
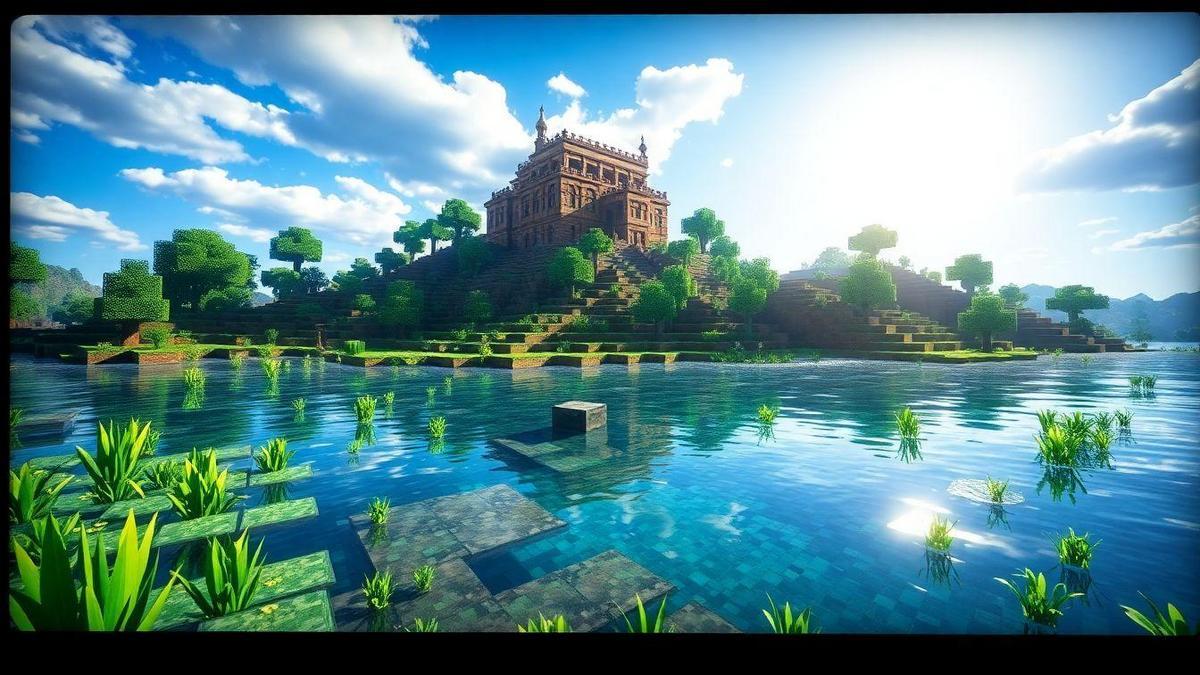
When I speak of realistic shaders In Minecraft, I'm referring to a set of visual effects that transform the way the game looks. They make light, shadows, and even water look much more cheers e realistic. It's like putting on a pair of sunglasses on a sunny day: everything becomes more beautiful and vibrant!
Benefits of Realistic Shaders
Shaders bring many benefits to the gameplay experience. Here are a few that I really appreciate:
- More immersive environment: With shaders, I feel like I'm inside the game, exploring a world that feels more real.
- Improved lighting: The light from the sun and lanterns shines in a way that makes each block feel special.
- Most beautiful water: The water becomes clearer and reflects the sky, which is quite a spectacle!
How Shaders Improve Graphics
Shaders improve graphics by adding details that aren't present in the original game. Here's how it works:
| Effect | Description |
|---|---|
| Dynamic light | The light changes as the day progresses, creating realistic shadows. |
| Reflections | Surfaces like water now reflect what's around them. |
| Soft shadows | Shadows are softer and more realistic, bringing environments to life. |
These effects make every adventure in Minecraft a new visual experience. It's like I'm playing a completely different game, full of beauty and detail.

How to Install Realistic Shaders in Minecraft
Installation Step by Step
Install realistic shaders in Minecraft is easier than it seems. I'll walk you through each step. First, you'll need a mod called OptiFine. This mod is essential for running shaders. Here's what you need to do:
- Download OptiFine:
- Visit the official OptiFine website.
- Choose the version that matches your version of Minecraft.
- Click “Download”.
- Install OptiFine:
- Open the file you downloaded.
- Click “Install”.
- After installation, you will see a new option in the Minecraft launcher.
- Download Shaders:
- Search for shader packs that you like. Sites like CurseForge e ShadersMods are great for this.
- Download the desired shader pack.
- Put Shaders in Folder:
- Open Minecraft with OptiFine.
- Go to “Options” > “Shaders”.
- Click on “Shaders Folder” and paste the files you downloaded.
- Enable Shaders:
- Go back to the shaders menu and select the pack you placed.
- Click “Done” and enjoy the beauty of your world!
Tips for Easy Installation
Here are some tips that helped me avoid problems during installation:
- Check Minecraft Version: Always confirm that the version of OptiFine and shaders is compatible with your version of the game. This avoids many problems.
- Use a Powerful PC: Shaders can be more demanding on your computer. If your PC is not that powerful, it may be better to use lighter shaders.
- Backup the Game: Before installing any mod, it's a good idea to back up your world. That way, you won't lose anything if something goes wrong.
Checking Minecraft Version
To check your Minecraft version, follow these steps:
- Open the launcher from Minecraft.
- On the main screen, you will see the game version at the bottom.
- Compare with the version of OptiFine and shaders you downloaded.

Best Shaders for Minecraft
Comparing the Top Shaders
When it comes to shaders for Minecraft, there is an incredible variety of options. I like to think of them as magic lenses that transform the game. Let's take a look at some of the main shaders I've tried and what each of them brings to the table.
| Shader | Description | Performance |
|---|---|---|
| Sildur's Shaders | It offers vibrant colors and incredible light effects. | Average |
| YOUR Shaders | Realistic visuals with shadows and reflections. | High |
| Chocapic13 Shaders | A perfect balance between quality and performance. | Average |
| BSL Shaders | Stunning water and sky effects. | High |
Popular Shaders and Their Features
Each shader has its own unique features that can make you fall in love with Minecraft even more. Here are some of my favorites and what I like most about them:
- Sildur's Shaders: The colors are so vibrant that it feels like I'm playing in a painting. The sunlight and shadows create an incredible atmosphere, especially at dawn.
- YOUR Shaders: I love how it brings a realistic touch to the game. The shadows are deep and the reflections on the water are breathtaking. It's like I'm in a real world!
- Chocapic13 Shaders: This shader is like a balancer Perfect. Not only does it look great, but it also doesn't weigh down my computer too much. I can play for hours without it crashing.
- BSL Shaders: The water and sky are simply stunning. Every time I see the sunset reflected in the water, I feel like I'm in a dream.
Choosing the Best Shader for You
Choosing the right shader can be a bit tricky, but don't worry! Here are some tips I use:
- PC Performance: If you have an older computer, you may want to start with lighter shaders like Sildur's.
- Playing Style: If you're looking for a more realistic experience, SEUS is a great choice. But if you want something more fun and colorful, Sildur's is perfect!
- Test and Try: Don't be afraid to experiment with different shaders. Sometimes what looks good in the description may not be what you expect.
If you are wondering how to install realistic shaders in Minecraft, it's quite simple! Generally, you need to download the shader, place it in the correct folder and activate it in the Minecraft settings. Then, you'll be ready to explore a more beautiful and vibrant world.
Shader performance in Minecraft
How Shaders Affect Performance
When I start playing Minecraft with shaders, the first thing I notice is how much more beautiful everything looks. The shadows, the light and the water come to life! But at the same time, I realize that this can slow down the game. Shaders require more of my computer, and this can cause FPS (frames per second) drops.
If my PC is not that powerful, I can face lag and crashes. It's like trying to run on a muddy field – it's hard! So I always try to find a balance between beauty and performance.
Optimizing Minecraft for Better Performance
To optimize Minecraft and ensure that shaders work best, I follow a few tips. Here are a few that have helped me a lot:
- Reduce render distance: This helps to reduce the load on my computer.
- Disable some effects: I can turn off effects like clouds or particles that aren't that important to me.
- Use an optimization mod: Mods like OptiFine work wonders to improve performance.
Ideal Shader Settings
Here are some settings that I consider ideal for using shaders in Minecraft:
| Settings | Suggestion |
|---|---|
| Render Distance | 8 chunks |
| Particle Effects | Minimum |
| Shadows | Casualties |
| Antialiasing | Off |
| FPS (Frames per second) | 60 or more |
These settings help keep the game smooth, even with shaders enabled. With these tips, I can enjoy the best of both worlds: the beauty of shaders and smooth gameplay.

How to Use Shaders in Minecraft
Enabling Shaders in Game
Enabling shaders in Minecraft is a simple step that completely transforms the look and feel of the game. To get started, I need to have the OptiFine installed. This is essential! Here's how I do it:
- Download and install OptiFine: I go to the official OptiFine website and download the version that matches my version of Minecraft.
- Open Minecraft with OptiFine: After installation, I open the Minecraft launcher and select the OptiFine version.
- Access video settings: In the main menu, I click on “Options”, then on “Video Settings”.
- Enable Shaders: Within the video settings, I find the “Shaders” option and click on it. Here, I can choose the shader I want to use.
Adjusting Shader Settings
After activating shaders, I like to tweak the settings to make things look nicer and smoother. Here are some tips I follow:
- Choosing the Right Shader: Some shaders are heavier and can slow down the game. I like to experiment with different options until I find one that works well on my computer.
- Adjust the quality: Inside the shaders menu, I can change the quality. If the game is slow, I reduce this quality.
- Lighting settings: Lighting is super important! I play around with the settings to see what looks best.
| Settings | Tip |
|---|---|
| Shadow Quality | Keep it on Medium for best performance |
| Reflections | Only enable if your PC can handle it |
| Lighting | Test different options |
Tips to Improve the Experience
To get the most out of shaders, I always follow a few tips:
- Update graphics drivers: This makes a big difference in performance.
- Disable unnecessary effects: Some options, like particles, can be turned off to improve fluidity.
- Test different shaders: Don't be afraid to experiment! Each shader brings a new feel to the game.

Troubleshooting Common Shader Problems
Common Installation Errors
When I started using realistic shaders in Minecraft, I faced some errors that can be quite common. One of the most frequent problems is the incompatibility between the shader and the version of Minecraft I'm using. Sometimes I've downloaded a shader that doesn't work because it's not compatible with my version of the game. To avoid this, I always check the shader's instructions before installing it.
Another mistake I've made was not having the OptiFine installed. OptiFine is essential for running shaders. So whenever I see that something is not working, the first thing I do is check if OptiFine is properly installed and updated.
Solutions to Performance Problems
When game performance starts to suffer, I follow a few tips to improve the situation. Here are a few that work well for me:
- Reduce graphics settings: Sometimes I lower the graphics quality to help with performance.
- Disable some shader effects: Many shaders have effects that can make the game look better, but also make it slower. I usually disable some of them to improve performance.
- Increase memory allocation: If I notice that Minecraft is crashing, I go into the settings and increase the amount of memory the game can use. This usually helps a lot.
| Tip | Description |
|---|---|
| Reduce settings | Lower graphics quality to improve FPS. |
| Disable effects | Turn off unnecessary shader effects. |
| Increase RAM allocation | Give Minecraft more memory in the settings. |
Resources for Support and Help
If I am still having problems, I do not hesitate to seek help. There are several forums e communities online where I can find support. Here are some places I recommend:
- YouTube: Many content creators make tutorials that help solve specific problems.
- Minecraft Forums: Sites like Minecraft Forum are great for finding solutions.
- Discord Groups: I also like to participate in groups where I can chat with other players and exchange tips.
Conclusion
So, ready to transform your Minecraft in a visual spectacle with realistic shaders? I hope this guide has helped you understand what shaders are, how to install them, and how to choose the best ones for your playstyle. Remember that the beauty of the game may require a little more from your computer, but with the tips from optimization e settings, you can find the perfect balance between performance and aesthetics.
Don’t hesitate to experiment with different shaders and tweak the settings until you find the combination that suits you best. After all, every Minecraft adventure can be a new visual experience!
If you want to learn more about how to improve your gaming experience or discover new tips and tricks, be sure to visit universedeappsLet's explore this incredible universe together!